If your vehicle’s serpentine belt is malfunctioning or you believe it needs replacement, act sooner rather than later. Driving with a compromised serpentine belt is simply not worth the risk.
Serpentine belt replacement is a DIY (do it yourself) job as long as you pay close attention to detail and make a concerted effort to get the job done right. Let’s take a look at a few serpentine belt replacement tips that will help you complete the project in a thorough manner.
Do Some Preparatory Work Before Beginning
Do not jump right into this project. Check out the belt routing diagram below the hood and in the manual before starting. If necessary, hop on the web to obtain the schematic for belt routing and print it for reference while working. Resist the temptation to wing it as the failure to use the factory routing will jeopardize the serpentine belt’s functionality and useful lifespan.
Practice Makes Perfect
Look closely at the manner in which the worn serpentine belt wraps itself around each of the pulleys. Hold the replacement serpentine belt in your hand and practice replicating the routing. Match the existing routing with such practice several times over so you feel confident and prepared to perform a DIY serpentine belt installation.
When in Doubt, Err on the Side of Being Overly Careful
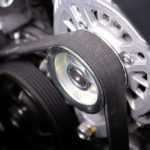
It is better to be careful and move through this replacement project slowly rather than act hastily and make a mistake. Take your time when looking for the self-adjusting tensioner. Be as careful as possible when releasing tension out of the serpentine belt. The serpentine belt’s backside runs along the tensioner, meaning it will look more similar to a roller than an actual pulley. Be uber-careful as you place the tool used for removal or a wrench along the tensioner. There should be ample space available to remove the tool after the tensioner has been released. Once you are certain the necessary space is available, go ahead and release the tension.
Examine the Tensioner Pulley
Do not install the new serpentine belt until you have examined the tensioner pulley for wear. Though you can remove the old belt, it is a mistake to rush through this process, assuming the tensioner pulley will be in perfect shape, undamaged, or in any other condition. You can gauge the tensioner pulley’s wear by spinning it with your hand. If the tensioner pulley is excessively loose, tight, or noisy, it should be replaced.
Check the Idler Pulleys and Pumps
Don’t overlook the pumps and idler pulleys during serpentine belt installation. Each of these components should move freely, without restriction. Furthermore, it is prudent to examine the water pump, smog pump, alternator, air conditioner compressor, and other accessories’ pulleys to see if they wobble or are flawed in another manner that necessitates replacement.
Carefully Add the New Serpentine Belt
Adding the new serpentine belt requires precisely lining up the ribs of the belt with the grooves of the pulley. It is critically important to ensure that the belt is not even the slightest bit twisted during the installation process. Take your time, examine the belt closely to ensure there is no twisting. Once you are sure the proper alignment is in place, you will rest easy knowing your DIY serpentine belt installation was done properly.